Wednesday, October 22, 2014

Hair Care

All you need to know!
Maintaining your hair is not an easy task, selecting the right products to use, from shampoos to Oils and conditioners can be very tricky. Knowing what type of hair you have is important in selecting products for hair. Hair is made of protein, so keeping a healthy diet is essential too. My post tells you about what you can do at home to get unbelievably beautiful hair! Also, it'll be guiding you about the right products you should be using.

For hair growth, may i present you the miracle mask! Trust me, this one's plain magic. I recently had my hair cut, Inverted bob, and not that i didn't like it or anything, but i wanted my hair to grow as fast as it can and with this mask, my hair happen to grow faster then ever! In like a month i noticed my hair growth was fast and my hair were thicker and fuller! You can see the difference in the picture below, two months later results. (p.s i know i gained weight in my second picture so ignore my fat face, haha)
Mask recipe is very simple, based on the fact that Mustard powder warms the skin of head and causes a rush of blood to the hair follicles.


Magic of Mustard powder.


Things you need:
2 tablespoons of dry Mustard powder
4 tblspns of hot water (not boiling)
1 egg yolk
2 teaspoons of olive oil
2 teaspoons of sugar

Directions:
Add water to mustard powder till its smooth and mixed properly, add the yolk, mix, add oil and sugar and mix. Apply to the roots. You can use a thick brush to apply it evenly. Let the mask on for about an hour and then wash your hair with shampoo, twice to get every bit of the mask washed away. Do this twice every week and you'll be noticing the result in a month!

Next comes, Hair Repair Mask.
For softer, lighter hair, may i present you the hair repair mask that won't disappoint you, na-ah, it can't. I do this very often and this one's my favorite! It's very simple and has just three ingredients that you can easily find in your very own kitchen!


Things you need:
2 tbsp honey (organic)
1 tbsp olive oil
1 tbsp apple cider vinegar

Directions:
Mix all ingredients in a small bowl until they are well combined. On dry, unwashed hair, apply to the roots and through combing your hair distribute evenly. Clip you hair up and leave the mask on for an hour. Wash, shampoo well and use conditioner if you would like. Happy healthy hair!

MORE MASKS

1- A little Olive oil plus a little honey can make a good hair mask too. For beautiful, SOFT, manageable hair.
2- Maple syrup plus coconut Oil is perfect too for soft shiny hair, leave the mask on for an hour, wash, shampoo and yaay!

DIY leave-in-conditioner 
You can now make your own leave-in-conditioner for damp hair with just three things! 


Things you need:
- Conditioner (i used palmers)
- Coconut oil
- Warm water

Directions:
Empty a spray bottle and wash it properly. Add conditioner in it, half cup, and fill half bottle with warm water, shake well to mix. Then add coconut oil and mix again.
Spray it to damp hair and enjoy silky way all day long!


Oils for hair
Olive Oil:
1- prevents hair loss
2- promote scalp health. It can keep the skin of your scalp in a better shape
3- Naturally condition the hair
4- Fights off Fungi and bacteria
5- Improves blood circulation

Coconut Oil:
1- Prevents hair loss
2- It keeps hair moist and soft
3- Conditions hair
4- Cool and soothe people with hot heads
5- Anti-dandruff 
6- lice protection
7- hair toning 
8- reduces split ends
9- Prevents baldness and grey hair

Mustard seed oil
1- Stimulates hair growth
2- Prevents pre-mature greying
3- Prevents hair loss

Products for hair
Shampoos
1- Kiss my face Big Body Volumizing shampoo

2- Paul Mitchell lemon sage thickening shampoo
3- Aveda pure abundance volumizing shampoo

4- Suave professionals volumizing shampoo

5- John Frieda full repair body shampoo

6- Finesse volumizing shampoo

7- Aussie aussome volume 2-in-1 shampoo


7- Nexxus Diametress volumizing shampoo

Sunday, October 12, 2014

Lipstick and Luxury: Fall Makeup Tutorial

Winter Makeup
So i found this beautiful lipstick shade from Color Studio and it's exactly what i wanted for winters! Its bold and beautiful. Simply luxurious look with bold eyeliner. I mean who doesn't like eyeliner? In winters it's a must for me.


Things you need:

- NAKED 2 urban decay
- ARTDECO 15 eye shade
- color studio eye stylist liquid eyeliner
- essence I<3EXTREME mascara
- Bourjois waterproof contour clubbing golden eye pencil
- MAC eye shadow brushes
- Bobbi brown eye shadow brushes
- color studio PURE MATT wicked 117 lipstick 
- Bourjois depuis 1863 blush
- Loreal paris infallible long lasting 16h foundation (15 porcelaine, for my skin color, fair)

Step #1
Cover you entire face with foundation, specially under eye area. You can use primer before this if you want. But this foundation feels very light and gives a matt fresh look.

Step #2

 Apply ARTDECO's 15 on the entire eye lid. As much as you can. The shade is very light and natural. I'm using MAC's eye shadow applicator brush for this.

Step #3

 Use NAKED 2's busted shade on the outer eye lids and as well as in the inner deep area of your eye, I'm using the brush that comes with Naked 2 for this.

Step #4

Then comes eyeliner, apply and thick line of eye liner and if you like, make a cat eye.
Than comes the golden eye pencil.
Apply golden eye pencil in the inner lower eye lid. 
Than:

Apply mascara and your eye make is done! 

Step #6

My favourite part! LIPS! Apply color studio's Wicked 117 and voila! you're ready!


Tuesday, August 5, 2014

Grilled Chicken Cheese Tacos

Tacos
This traditional Mexican dish, full of flavor, come together easily making them perfect for busy nights and get-together! With caramelized onions and BBQ chicken breast, this dish is classy and easy to make. It hardly takes 60 minutes and its ready!


Ingredients:

- Chicken breasts, chopped in bite sized pieces
- Butter, room temperature
- Olive oil
- BBQ sauce (i used American Garden honey BBQ)
- 2 Tomatoes, chopped
- 1 onion, sliced
- 1 Capsicum, sliced
- ground Paprika 
- salt and pepper to taste
- El Sabor wraps tortillas 
- Cheese slices

DIRECTIONS:
Step #1:
Marinate chicken pieces by covering chicken in bbq sauce and refrigerating it for about 2 hours. 

Step #2: Meanwhile, in a pan, heat 1 tblspn butter. Throw sliced onions and cook till they are soft and caramelized.

Step #3: In a frying pan, heat oil and add marinated chicken, grill it for about 6 minutes, add tomatoes, salt and pepper, paprika and 1 tablespoon bbq sauce. Cook till chicken is ready.


Add capsicum and cover the pan for about 5 minutes.

Step#4: Heat tortillas on low heat till ready to use.

Step #5: 

Put cheese slices on tortilla.


Add chicken filling on top of the cheese covering half of the tortilla.


Top with caramelized onions. And fold tortillas.
And enjoy!


Tuesday, July 22, 2014

Cake Alaska

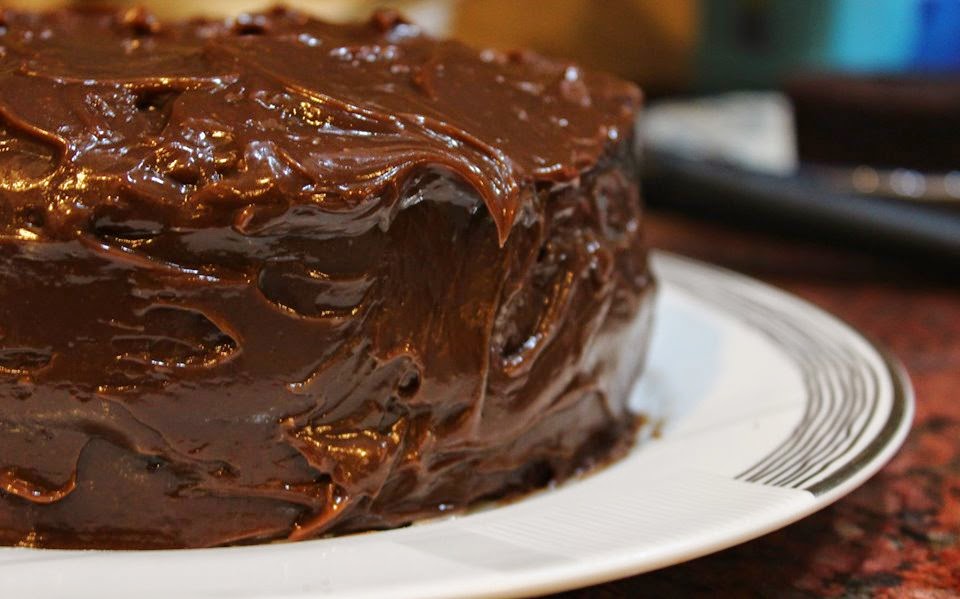
Cake Alaska with Chocolate Ganache
Some recipes are your all time favourite, and this is mine! Its my midnight treat. Cake Alaska is a must in summers, and if you haven't ever tried it, well then, you're missing a lot. I'm not completely following the traditional recipe of flaming Alaska cake or baking ice cream filled chocolate cake at 300degrees, my recipe is very simple yet classic. I skipped the meringue and added ganache to the recipe, so here's it.


Ingredients:
- 2 cups plus 2 tablespoons sugar (icing sugar for best results)
- 1 3/4 cups all purpose flour
- 3/4 plus 2 tablespoons unsweetened cocoa powder
- 1 1/2 teaspoons baking powder
- 1 1/2 teaspoons baking soda
- 1 1/2 teaspoons salt
- 2 large eggs
- 1 cup milk
- 1/2 cup vegetable oil
- 1 tablespoon pure vanilla extract
- 3/4 cup plus 2 tablespoons boiling water

DIRECTIONS:
Step #1: Preheat the oven to 180 degrees.
Step #2: Whisk all the dry ingredients of the cake, in a large bowl. Add eggs, milk, oil and vanilla and beat with an electric mixture on low speed for about 2 minutes, and on high speed for about 3 minutes.

Step #3: Whisk in the boiling water. Batter must be very thin and runny so do not worry. That's exactly what it's suppose to be like.
Step #4: pour in two equal sized round cake pans and bake for about 45 minutes, or more if needed.
Step#5: When baked, take the cake out and leave to cool for about 5 minutes. Take the cake out of the pans and on two cake plates. Let cool.
Step #6: Cut out a smaller circle from the middle of one cake, you can use a round cookie shape to cut the cake out.
Step #7: fill the empty round space with ice cream, vanilla. 
Step #8: Layer this cake with the other one and cover your cake with Chocolate ganache.
Step #9: You can make your ganache with heating one cup heavy cream over low heat and melting 400 grams of chocolate (milk or dark) in it till the mixture is smooth and shiny. Put it in the refrigerator till its cool and thick enough. You can beat the ganache on max speed to get the desired thickness.

Cover the cake with ganache, i like to keep my ganache messy and more like an old fashioned home made style. My ganache is not really thick, its shiny and smooth. You can use Chocolate Buttercream instead of the ganache, but i prefer ganache, it give more luxury feel to the cake. 

Enjoy!