Sunday, December 13, 2015

Hair Care

Keratin Hair Care.
Dikson's Keratin Action, Shampoo and cream.

I know i'm late on my blog post (always am) but you know i always wait for something worth posting and something that is informative and helpful to you guys! So here it is, Hair care product review. This one's for Keratin treated hair, and also for damaged, dry, rough ones.


My hair are not Keratin treated, but i got these anyway. I wanted to try something new, I'm always trying something new, you guys know that, but when it comes to my hair, i like to stick to my favourite old shampoo (Finesse that is). But this time, i really wanted to buy these and try, and let's be honest, the expensive-looking sleek bottles made me go for it, lol. What's the worst that can happen, right? So anyway, i've been using them and i have to say, i like the results. My hair are not rough, they are more manageable, and healthier. So this was a good decision to get them. But, yes there's a but. They are expensive! each bottle is like PKR 1000 something. (can't remember the exact price, but if someone wanna know message me and i'll check and hit back)


Okay, tell you what, i'm thinking of getting or doing myself a keratin hair treatment, that is if i get the right material, i have been looking for it everywhere but couldn't find it! but i will, and once i get it done, i will be continuing using these two and will be updating you guys on how it works on kertain treated hair. Because so far, i'm very much satisfied with the result. 


The shampoo won't get much foamy or leathery, but they smell as expensive as they are. Unlike other shampoos, it doesn't dry your hair at all, and i may not recommend it for people with oily hair. As my hair are super dry, and frizzy, this shampoo and cream are my two new best friends! People with dry hair can totally trust Dikson's Keratin Action due. Tried and tested, you guys should give this a try! I don't think i have anything else to say, expect that i love you guys and i'm hope you find this review worth reading! xoxo 


Friday, October 23, 2015

Halloween Makeup

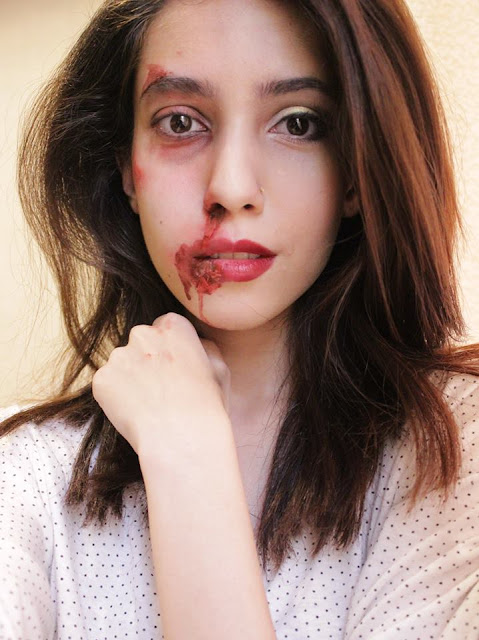
Half Glam, Half Beaten Up Zombie!
Halloween is just around the corner, with halloween themed parties and dances, and so many different makeup and costume ideas to select from. My half glam half beaten up zombie makeup is very very simple and real looking. Have a look!


Things i used on my glam side:
- Clinique super balanced foundation
- catrice defining blush
- Color Studio lipstick in Wicked 
- Naked 2 eyeshadow (darkest shade)
- golden eyeshadow essence
- aqua color eye liner in black


Things i used on my Zombie side:
- Aqua color in black
- Aqua color in red
- tissue papers
- paint brush in 8

Directions:
Do your glam makeup on half of your face, starting from eye makeup to blushon and covering half of your lips with lipstick.


After you're done with the makeup, start with your zombie eye bruise, from the Naked 2 eye palette use the shade "busted" on your under inner eye part and on your eye crease. You can use your finger to apply the shade on your under inner eye are like in the picture below.


Use red aqua color and apply it on your eye lid and under eye area, mixing it with your busted shade. You can use the color and same technique to make little bruises all over your face.


Next comes your heavily bleeding nose and lips.
For a dry blood effect, use tissue paper, place it where needed to give effect and apply red color, black color in some parts just for the realistic effect.


I used a small upside down triangle shape tissue for my nose and round shape for my lips. I also used eye lash gum to first paste the tissues on the area and later applying the colors on it. Using my fingers i gave it a smokey shade and tiny bruise around my nose finished my look!


Share and pin the post if you like! Zoom zoom. 


Wednesday, October 21, 2015

Assassin's Obsession

Makeup Look
It's been a awhile now since i've been looking for inspiration desperately. I have been hiding in a hole all day and spending nights in front of my laptop screen searching for something to inspire me (and watching hell lot of movies, and Ellen!). But, just yesterday when i was at Al-Fatah, checking out their new High Life makeup section and trying my best not to buy anything (since i already spent a lot of money on food, yeah, typical, i know), my ever-searching-desperate eyes landed on this beautiful lipstick, and the colour! Oh the colour! It's exactly what i wanted, YES!! I bought it, right then right there. And wait till you see it, if it won't obsess you, i don't know what will.


Amazing, right? The lipstick is from Color Studio Professionals, The shade is Assassin. 


It may look a bit dull in the above picture, but it looks really fresh on your face, it's also matt, and smooooooth! And the formula is very satisfying, like it's price which is only PKR 750/-

Here are other things i used on my face.

On face: - Clinique super balanced foundation
- beauty blender
- Defining Blush by Catrice 
On eyes: - stage line eye roll on shadow in Golden (also i used Naked 2's busted on my eye crease)
- Rimmel Wonder'full Mascara
- Aqua color eye liner in black 
On lips: - Color Studio pure matt lipstick in Assassin


Pin and Share the post if you like it! Thanks and take care! ;)


Tuesday, August 25, 2015

Back To School

What's in her bag?
Makeup Edition: Basics. 

Let's talk about makeup, NO, let's first talk about wearing makeup in summers. We all have to deal with oily skin, lipstick fading away and makeup melting down in sun, don't we? We all run around searching for the perfect foundation and long lasting lipstick that may get us through the day. I have been doing my research all summers, using different foundations and listing down the ones with best results. I have picked out my favorites for you to try, and i assure you, you will love them as much as i do. So let's see what's in my back-to-school bag?


Foundation: Clinique superbalanced liquid foundation. Why's this my favorite? It has a very natural coverage, perfect for daily wear, it's light on the skin and feels like you have nothing on. Sets perfectly, covers dark spots and pimples and don't make them gray. Also, the best part, your face won't be getting oily and sticky if you have this on, my word, it absorbs oil when and where needed and balance out on your face, so you won't have to worry about getting shiny face under sun.

Lipstick: MAC lipstick in brave. Why's this my favorite? first, the color. Second, it's long lasting. The color is truly adorable, it's life saving trust me on this one. It looks natural and the fact that it's matte, makes me fall in love with this lipstick more and more. it brightens your face even on your tiresome days. It's a very natural looking shade of pink. You won't regret buying this one.

Lip stain: revlon colorburst lacquer lip balm - 130 Tease Seductrice. Why's this in my back-to-school bag? It's for those special days when i'm looking for a boost of confidence and fresh looking face. It's peachish shade gets me in the mood and the fact your lips feel a hint of mint when you wear it makes me keep this balm in my bag all the time. 

Mascara: Rimmel London Wonder'full Mascara. Why i love this? My eye lashes are very light and barely even there, this magic wand makes them look heavy and volumized. Also, it has argan oil in it, which is good for the lashes, so wearing mascara everyday won't be hurting you or your lashes anymore. Infact, it's good for them. 

Hair serum: John Frieda Frizz-ease Nourishing oil serum. Why's this in my bag? It saves me from having a bad hair day. I won't recommend this to people with oily hair, but for me and every one who knows the struggle of having dry, frizzy hair, will love what this serum do to your hair. It makes them look silky and manageable. Plus, it comes with Argan oil too! 

 Perfume: Juicy Couture Gold couture. Why.. well, this is my scent, It has to be in my bag. 

Bag: Gifted to me by my better half, Azka Saifullah. <3


Don't forget to share and pin it! zoom zoom.


Sunday, June 14, 2015

Makeup Tutorial: Smoked blue eyes

And Nude Lips!
I know i deleted my "Mermaid Eye" makeup tutorial and i promised you guys i'll be posting a better one. So this is it. Smokey blue eyes to go with soft nude lips and pink cheeks. I'll be using Essence metal glam blue eyeshadow with Naked 2 shades. These are the highlights of my tutorial.


Things i used:

Face:
- Clinique superbalanced makeup foundation
- beauty blender
- Catrice Blush 

Eyes:
- NAKED 2 
- Essence metal glam in blue
- Essence soo glow highlighter
- Rimmel Wonder'full mascara
- Bourjois waterproof eyeliner pencil in blue
- colorStudio eye stylist thin brush eyeliner
- eyeshadow brushes 

Lips:
- Maybelline honey beige lipstick


STEP#1 (face)

Clinique Superbalanced makeup foundation is a life saver in summers, specially for me, i happen to have oily skin which gets dry right after i wash my face. So i have to apply moisturizer every time i shower or even wash my hands and as i head out in sun, my makeup starts to melt down, which was my story before i found this secret potion in a small bottle. It is small for it's big price. The coverage is moderate and it's water-based, perfect for daily use. And perfect for me. 
Using a beauty blender, blend in the foundation on your entire face, starting from under your eyes area. You will not see any grey areas on your face if using this foundation. 

STEP#2 (eyes)


Chose the lightest shade in naked2 (that'll be foxy) and cover your entire eyelid.


Use Essence metal glam in blue to cover outer half of your eyelids. Blend using a soft medium sized eyeshadow brush. Starting from the outer corner of your eye, brush busted shades from Naked 2 into the crease of the eye. 


For the smokey effect, apply the blackout shade on the outer corner of your eyelid and blend it towards the end making an angle. I applied my blackout shade after applying my eyeliner so i make a neat winged eye.


Apply your winged eyeliner, i use a very thin brush for this. Either this or maybelline's gel with angled brush liner. (for eyeliner application method see my 10 minute flawless face makeup tutorial).


And for the final touch, apply your mascara. I'm using Rimmel's Wonder'full mascara. I happen to have very thin eyelashes, they are barely there, so this magical mascara does the trick for me. For me, this baby is my magic wand, and without this, i'm incomplete and weak. Seriously though, this is life. 
Apply essence soo glow highlighter just below your eyebrows and on the cheeks too (but later)

STEP#3 (Cheeks)


Keeping it a low key, apply blush with a big brush, starting from under your cheek bones all the way to your cheeks. 
This is the easiest part.

STEP#3 (lips)


Using Maybelline's Honey Beige lipstick, cover your lips all the way to their outer ends. Under the lower outer ends of your lips apply essence soo glow highlighter, also, apply highlighter on the cheek bones and under your eyebrow area. And you're good to go. 

Zooom, zoom!


Pin it if you like it, and leave me your comments! love, Ayesha. xx